Wednesday, December 29, 2010

DKoK Bases completed

Merry Christmas everyone!

Its funny, time off and a new project gives you some very big motivation!

After casting the 25mm bases and the 60mm bases i cleaned them up and undercoated with GW Chaos Black. I used my airbrush with Vallejo German Grey, dark grey and light grey and GW Bestial Brown and Bubonic Brown. Then a wash of Badab Black on the greys and Devlan Mud on the Browns. Please make sure you let these dry overnight, as these washes really don't dry very well.

I also picked out some details of the metals and some pipes with colour. I found a very cool looking crop seed grass to use for these bases, I think they will compliment the Krieg models very well.


Friday, December 24, 2010

Resin your mind!

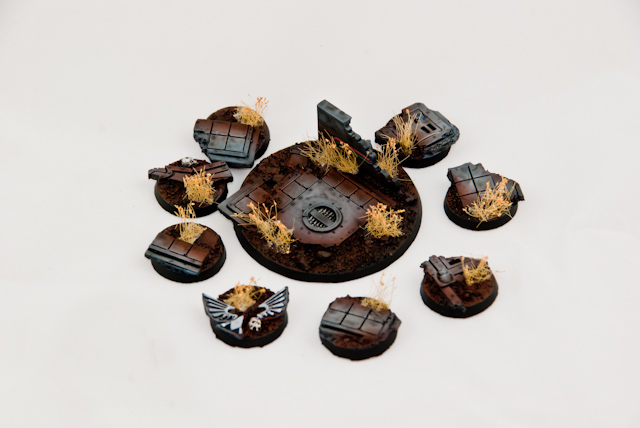
Ok, for a while now I have been meaning to do a pic by pic tutorial on how I do my resin bases. This new army project is a great reason to do it if any! If you have any further queries about this process after reading, please feel free to email me!

SpektreOZ

Step 1;

Design your bases. Now be prepared to do a decent amount of work on these as you cant have too many nooks and hole for air bubbles to be trapped!


Step 2: encase the bases in a container so your silicone cant escape. Handy hint; use plasticine to fill in any holey areas and smooth out your silicone mold tub. You can see how I've used it to create a flat base (which will be the top) on these ones.

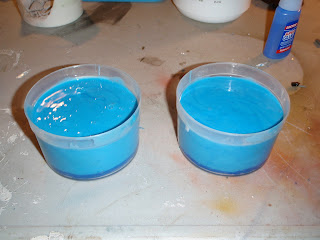
Step 3: I use Barnes Ultrasil for my molds. Inexspensive (relatively) and easy to use. Handy hint: make sure you ALWAYS keep and old cloth or rag around when you do this stuff. Mix you silicone in the correct quantities as they all differ. Barnes is actually based on a 10:1 weight ratio rather than amount of liquid

Pour from quite high up to make sure you get a long thin stream pouring onto your base. This prevents air bubbles getting trapped if you just poured it into a big blop onto your base. Make sure you cover the extremities of you bases adequetly.


Step 4: Push around with the end of a old paintbrush to release any air bubbles in the silicone. Leave for the recommended cure time (Mine is 6 hours)

Step 5: Release mold from base and container and clean any bits that have come off the base into the mold silicone itself.

Step 6: Sprinkle baby powder into the mold and spread around with an old big brush (like a makeup brush) and shake to release excess.

Step 7: Mix your resin to the correct mix. Again make sure you have rag or cloth handy. You can use any container, I use medical measuring cups. My resin that I use is Barnes 4PU. it give a good result, the only trick is you only have 4 minutes till set. 15 minutes to pop the mold. To start off with I would get a 15 min cure time resin.

Step 8: Mix thoroughly but try not to make too much aggressive movements. try folding it like a cake mixture, if you beat too rigorously you will let air get into the mixture. Pour into your mold very slowly and very close to you mold.

I fill my bases up just to the natural viscosity of the liquid to make sure I don't have any hollows in the bases. i then just wipe the excess off with a straight edge very carefully before it starts to go off.

Step 9: Wait till done.... I do this to pass the time....


Step 10: Pop your bases out and gaze in the beauty. Repeat till you have enough for that elite army or gibbering horde!

NB: Please use the right precautions when using silicone and resin....

Thursday, December 23, 2010

Ghost of Christmas New

Merry xmas eve gamers! Well this time of year brings great trepidation for us gamers as we get present of all things nerdy and gamey! I love it!

My christmas came early as I was trolling on a local forum (www.wargamerau.com) and looking at the commision painting services forum and theere was a Death Korps of Krieg army that someone would like to be assembled and aswell as painted. I threw my hat in the ring and after a few conversations found myself now the commision painter of a DKoK army!

The owner, Jack, has allowed me to document this for all people that are interested. i myself love the look and feel to the Krieg models and can't wait to get my hands on them. He's going for none GW tanks, pig iron ones apart from his vendetta and hellhound! These models really do look great and will look extra cool with the digital camo scheme I have in mind with them! pig iron tanks
chimera:
leman russ:


I will be constantly updating this as I recieve the models and there will be an update straight after this about the urban custom resin bases I have designed and setting for the use of this army!

Wish me luck!

SpektreOz

Sunday, December 12, 2010

Haunted works...

Hey guys,

Just thought I'd put a quick post up saying that my promise to regularly update this blog has stopped due the acquisition of a man cave... It is in the last stages of being fitted out but will include areas for airbrushing, undercoating and my very own soft boxes for taking photos.

Speaking of which, a sneak peek of what is to come from me...


Monday, November 22, 2010

The New Ghost

So I've started Ghost painting services started a little bit earlier than intended due to The Imperial Vox Cast asking if anyone was interested in doing some commission painting for no commission for a couple of the pod casters...

Too good an opportunity to pass up so I've had to hurriedly learn this blog thing...

I have been painting for as long as I've been gaming and i'm heavily into the entire hobby aspect of Warhammer 40,000. I have a true passion for the hobby and would love to see other people get the same pleasure out of playing with a fully painted army as I do.

In the next few days I will be adding more to this blog like painting services costs and specifications about painting. If you have any comments and queries, please don't hesitate to contact me.