SpektreOZ
Step 1;
Design your bases. Now be prepared to do a decent amount of work on these as you cant have too many nooks and hole for air bubbles to be trapped!
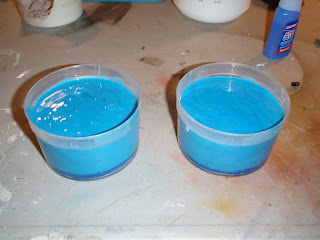
Step 2: encase the bases in a container so your silicone cant escape. Handy hint; use plasticine to fill in any holey areas and smooth out your silicone mold tub. You can see how I've used it to create a flat base (which will be the top) on these ones.
Step 3: I use Barnes Ultrasil for my molds. Inexspensive (relatively) and easy to use. Handy hint: make sure you ALWAYS keep and old cloth or rag around when you do this stuff. Mix you silicone in the correct quantities as they all differ. Barnes is actually based on a 10:1 weight ratio rather than amount of liquid
Pour from quite high up to make sure you get a long thin stream pouring onto your base. This prevents air bubbles getting trapped if you just poured it into a big blop onto your base. Make sure you cover the extremities of you bases adequetly.

Step 4: Push around with the end of a old paintbrush to release any air bubbles in the silicone. Leave for the recommended cure time (Mine is 6 hours)
Step 5: Release mold from base and container and clean any bits that have come off the base into the mold silicone itself.
Step 6: Sprinkle baby powder into the mold and spread around with an old big brush (like a makeup brush) and shake to release excess.
Step 7: Mix your resin to the correct mix. Again make sure you have rag or cloth handy. You can use any container, I use medical measuring cups. My resin that I use is Barnes 4PU. it give a good result, the only trick is you only have 4 minutes till set. 15 minutes to pop the mold. To start off with I would get a 15 min cure time resin.
Step 8: Mix thoroughly but try not to make too much aggressive movements. try folding it like a cake mixture, if you beat too rigorously you will let air get into the mixture. Pour into your mold very slowly and very close to you mold.
I fill my bases up just to the natural viscosity of the liquid to make sure I don't have any hollows in the bases. i then just wipe the excess off with a straight edge very carefully before it starts to go off.
Step 9: Wait till done.... I do this to pass the time....
Step 10: Pop your bases out and gaze in the beauty. Repeat till you have enough for that elite army or gibbering horde!
NB: Please use the right precautions when using silicone and resin....


When you searching for Colour Stylists, QuotePainting.com.au provides a wide selection of registered Colour Stylists specialists for commercial or home painting, including commercial painters, house painters, interior designers, colour coordinators, stylists and much more.
ReplyDeleteI wanna say that I'm so happy that I found this useful blog, if you take a look at it you will appreciate the every detail of this page, so keep writing!-color consultation Los Angeles-
ReplyDelete
ReplyDeleteshareit apk download
shareit downloads
download shareit
download shareit apk
Now that we presented the top three features which are being introduced in the latest update.
ReplyDeletekingroot
king root
kingoroot
kingroot app
kingroot download
I found this useful blog, if you take a look at it you will appreciate the every detail of this page, so keep writing...
ReplyDeleteredboxtv
redbox tv
redboxtv app
redboxtv download
if you want apk directly to your android click the links.
quickboot
ReplyDeletequickboot app
iroot
iroot app
want to know more about other apps check our site.
instagram images upload pc
ReplyDeleteif you have any quires on it just drop a mail or comment.
Thank you for posting such a great article! It contains wonderful and helpful posts. Keep up the good work
ReplyDeleteCSC District Manager List | CSC Helpline Number